recompile OpenSSL 1.1 & NGINX 1.25 के लिए TLS 1.3 (CentOS 7), उस परिदृश्य के बाद जहाँ आप पहले से ही सर्वर ओ पर स्थापित कर चुके हैं पुराने संस्करण openssl nginx सेवा से जुड़ा हुआ है।
अधिक विशेष रूप से, सक्रिय करने में सक्षम होने के लिए OpenSSL 1.1.1t सेवा के लिए NGINX, जो पुराने संस्करण के साथ चलता है। OpenSSL 1.0.2k.
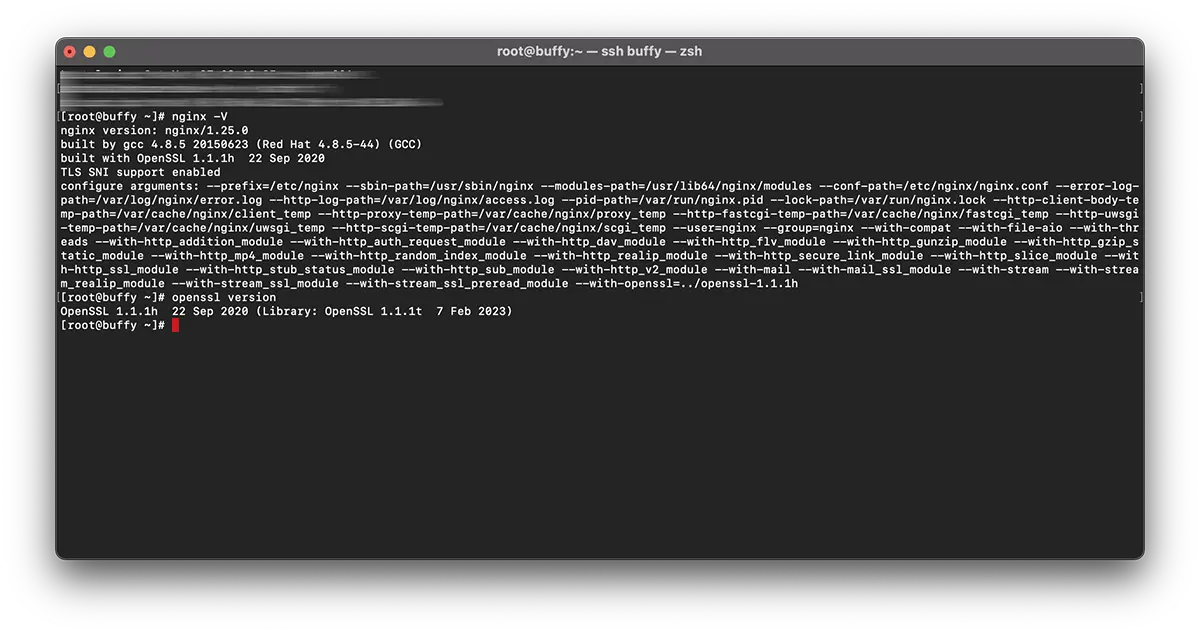
# nginx -V
nginx version: nginx/1.25.0
built by gcc 4.8.5 20150623 (Red Hat 4.8.5-44) (GCC)
built with OpenSSL 1.0.2k-fips  26 Jan 2017
TLS SNI support enabled
# openssl version -a
OpenSSL 1.1.1t 7 Feb 2023इसका मतलब है कि के दो अलग-अलग संस्करण हैं OpenSSL. सिस्टम पर स्थापित एक संस्करण "yum("1.0.2k-fips) और एक संस्करण OpenSSL मैनुअल संकलन द्वारा स्थापित (openssl 1.1.1t).
शास्त्रीय रूप से, अधिकांश पुनः स्थापित करने की अनुशंसा करते हैं 'OpenSSL' सर्वर स्तर पर। यह आदेश को क्रियान्वित करना होगा: yum remove openssl. लेकिन यहां एक बड़ी समस्या है. पुराने संस्करण की स्थापना रद्द करने के साथ OpenSSL, आपको कुछ निर्भर ऐप्स को अनइंस्टॉल करने की भी आवश्यकता हो सकती है। जैसे कि: nginx, MariaDB-server, cerbotइसके अलावा भी बहुत कुछ।
एक आसान समाधान पुन: संकलित करना है openssl 1.1 & nginx 1.25 के लिए TLS 1.3.
कपि ins
पुन: संकलित ट्यूटोरियल OpenSSL 1.1 & NGINX 1.25 के लिए TLS 1.3 (CentOS 7)
मेरे उदाहरण में, पुनर्संकलन के लिए है nginx/1.25.0 & OpenSSL 1.1.1h किताबों की दुकानों का उपयोग करना OpenSSL 1.1.1t.
एनजीआईएनएक्स को पुन: संकलित करें।
1. फ़ाइल बनाएँ: nginx-with-tls13-compile.sh
sudo nano nginx-with-tls13-compile.shजहाँ आप स्क्रिप्ट जोड़ते हैं:
#!/bin/bash

## nginx
NGINX=nginx-1.25.0.tar.gz

if [ ! -f "${NGINX}" ];then
    wget https://nginx.org/download/${NGINX}
fi

ND=$(basename $NGINX .tar.gz)
if [ ! -d "${ND}" ];then
    tar zxvf ${NGINX}
fi

cd ${ND}

## pre require package
## yum install gcc pcre-devel zlib-devel

./configure --prefix=/etc/nginx \
    --sbin-path=/usr/sbin/nginx \
    --modules-path=/usr/lib64/nginx/modules  \
    --conf-path=/etc/nginx/nginx.conf \
    --error-log-path=/var/log/nginx/error.log \
    --http-log-path=/var/log/nginx/access.log \
    --pid-path=/var/run/nginx.pid \
    --lock-path=/var/run/nginx.lock \
    --http-client-body-temp-path=/var/cache/nginx/client_temp \
    --http-proxy-temp-path=/var/cache/nginx/proxy_temp \
    --http-fastcgi-temp-path=/var/cache/nginx/fastcgi_temp \
    --http-uwsgi-temp-path=/var/cache/nginx/uwsgi_temp \
    --http-scgi-temp-path=/var/cache/nginx/scgi_temp \
    --user=nginx \
    --group=nginx \
    --with-compat \
    --with-file-aio \
    --with-threads \
    --with-http_addition_module \
    --with-http_auth_request_module \
    --with-http_dav_module \
    --with-http_flv_module \
    --with-http_gunzip_module \
    --with-http_gzip_static_module \
    --with-http_mp4_module \
    --with-http_random_index_module \
    --with-http_realip_module \
    --with-http_secure_link_module \
    --with-http_slice_module \
    --with-http_ssl_module \
    --with-http_stub_status_module \
    --with-http_sub_module \
    --with-http_v2_module \
    --with-mail \
    --with-mail_ssl_module \
    --with-stream \
    --with-stream_realip_module \
    --with-stream_ssl_module \
    --with-stream_ssl_preread_module \
    --with-openssl=../$(basename $OPENSSL .tar.gz)

make

sudo make install

nginx -V
नई फ़ाइल सहेजें।
2. नई निष्पादन योग्य फ़ाइल बनाएँ:
chmod +x nginx-with-tls13-compile.shपुनर्लेखन nginx.service
3. का बैकअप बनाएं nginx.service.
cat /lib/systemd/system/nginx.service > /srv/nginx_service.txt(आप अपने लिए कोई भी रास्ता चुन सकते हैं nginx_service.txt)
4. सेवा के लिए फ़ाइल बनाएँ nginx: nginx.service
sudo nano nginx.service5. फाइल में नई फाइल nginx.service पंक्तियाँ जोड़ें:
##  /lib/systemd/system/nginx.service

[Unit]
Description=The NGINX HTTP and reverse proxy server
After=syslog.target network.target remote-fs.target nss-lookup.target

[Service]
Type=forking
PIDFile=/run/nginx.pid
ExecStartPre=/usr/sbin/nginx -t
ExecStart=/usr/sbin/nginx
ExecReload=/usr/sbin/nginx -s reload
ExecStop=/bin/kill -s QUIT $MAINPID
PrivateTmp=true

[Install]
WantedBy=multi-user.target
6. फ़ाइल को कॉपी करें 'daemon".
sudo cp nginx.service /lib/systemd/system/nginx.service7. फ़ाइल कॉपी हो जाने के बाद, कमांड का उपयोग करके फ़ाइल अनुमतियों को अपडेट करें:
sudo chmod 644 /lib/systemd/system/nginx.service8. कॉन्फ़िगरेशन को पुनः लोड करें systemd आदेश का उपयोग करके परिवर्तनों को ध्यान में रखना:
sudo systemctl daemon-reload9. पुनः आरंभ करें ngnix.
sudo systemctl restart nginxrecompile OpenSSL / NGINX के लिए TLS 1.3
10. उसी फोल्डर में जहां आपके पास फाइलें हैं nginx-with-tls13-compile.sh एसआई nginx.service, एक नई फ़ाइल बनाएँ: openssl-1.1-compile.sh.
sudo nano openssl-1.1-compile.shस्क्रिप्ट जोड़ें:
#!/bin/bash

## Compile OpenSSL
OPENSSL=openssl-1.1.1h.tar.gz

DONE=openssl-compile-done

if [ ! -f "${DONE}" ] ;then
    wget https://www.openssl.org/source/${OPENSSL}

    tar zxvf ${OPENSSL}

    cd $(basename $OPENSSL .tar.gz)

    ./config shared no-idea no-md2 no-mdc2 no-rc5 no-rc4 --prefix=/usr/local/

    make

    sudo make install

    cd ..

    touch ${DONE}
fi

export LD_LIBRARY_PATH=$LD_LIBRARY_PATH:/usr/local/lib64/

read -n1 -r -p "$(/usr/local/bin/openssl version) - Press any key to continue..." key

source ./nginx-with-tls13-compile.sh
बदलना "OPENSSL=openssl-1.1.1h.tar.gz” उस संस्करण के साथ जिसे आप एनजीआईएनएक्स के साथ स्थापित और पुन: संकलित करना चाहते हैं।
11. स्क्रिप्ट को निष्पादन योग्य बनाएं:
chmod +x openssl-1.1-compile.sh12. कमांड चलाएँ:
./openssl-1.1-compile.shपुनर्संकलन प्रक्रिया पूरी होने तक प्रतीक्षा करें OpenSSL & NGINX.
अगर हम आपकी मदद कर सकते हैं या कुछ और जोड़ना है, तो टिप्पणी अनुभाग खुला है।